Most people tend to stick to a standard joint or bong when they smoke, but if you want something a little different, then a cross joint will definitely make things more interesting!
Whether you’ve heard of this type of joint before or you’re just curious about it, rolling a cross joint can be pretty difficult, especially if you’ve never done it before.
However, we’re here to help! We will be going over exactly what a cross joint is and how to roll one. You’ll be able to impress your friends with your rolling skills once you have finished reading this article!
What Is A Cross Joint?
Cross joints became popular with mainstream audiences after the release of the 2008 movie Pineapple Express, which starred James Franco and Seth Rogan. Though James Franco’s character made it in the movie, it was actually Seth Rogan who rolled it!
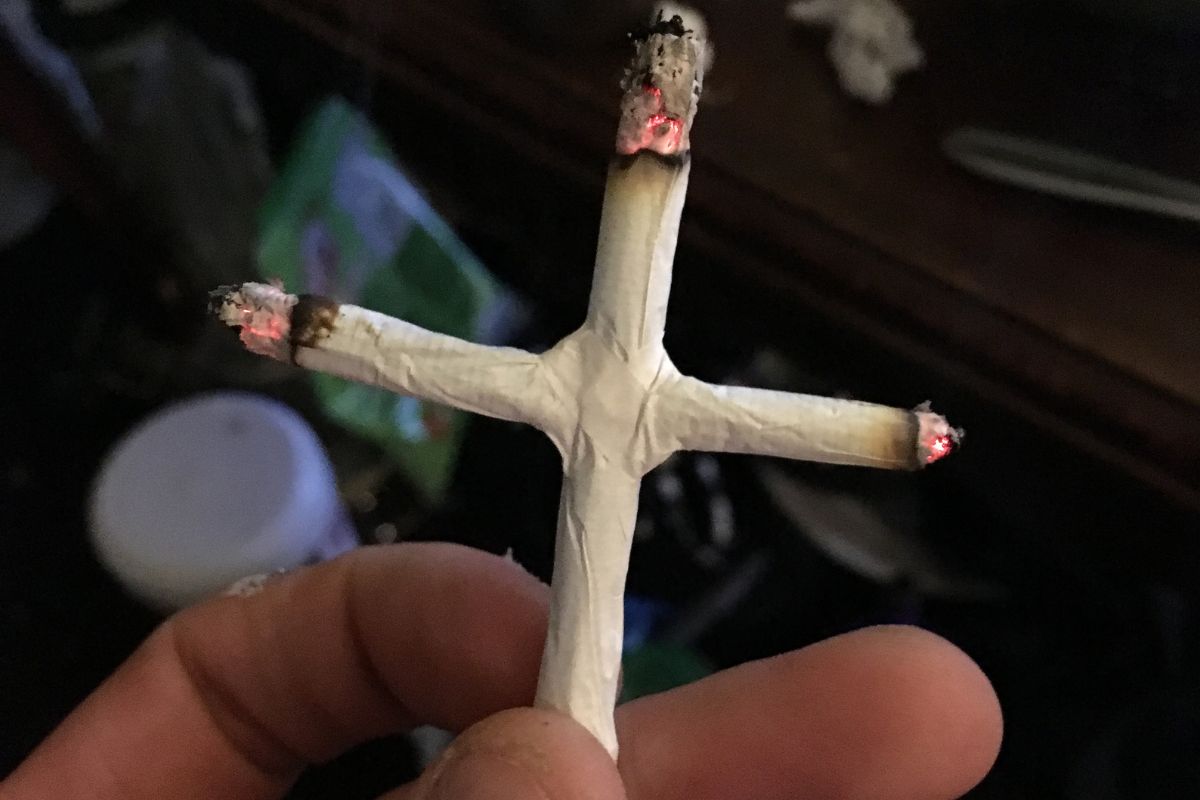
Cross joints are pretty much exactly what they sound like- a joint in the shape of a Christan cross. They consist of three ends that are lit and made by fitting two joints together.
They are quite popular if you are smoking with friends or at a party, and you will definitely impress your friends when you roll one.
How To Roll A Cross Joint?
In just 7 steps, you will be able to make a cross joint in no time! If you have never rolled one before, you may need to practice a bit, but once you get the technique right, you will find them super easy to make again and again!
1. Roll A Joint
The first step just requires you to roll a fat joint, so if you already know how to do that, you’re off to a good start!
You do have to make sure that this joint is a bit fatter than what you’d regularly roll, but that’s just because it will make attaching the second joint a lot easier.
When we say a fat joint, we mean the thickness, not the length, so keep that in mind before you start rolling.
This step is optional, but if you want to roll a joint just like Seth Rogan, then this step is essential. Inserting Cardboard into the butt end of the joint is also known as putting a “roach” in, and it usually keeps the mouth guarded against being burnt.
All you need to do for this step is cut a small strip of thin cardboard. It doesn’t have to be too long, so about half an inch is fine.
Once you have done this, you need to roll it into a cylinder, which will be about half the size of the actual joint.
3. Roll A Thin Joint
Next, you will need to get a small rolling paper to roll a thin joint that will be used as the cross-section of your cross joint.
It’s important to note that with this joint, the thinner it is, the easier the whole cross joint will be to put together (see also “How To Put Out A Joint“). Once you know what you’re doing though, you can make this second joint whatever size you want.
4. Poke A Hole In Your First Joint
Go back to your first joint (the bigger one) and use a needle to poke a hole about three-quarters of the way from the bottom. It’s very important that you be gentle when you do this and don’t rush.
Once you have poked the hole, you then need to work the hole to make it wider. Again, don’t rush and be gentle or you will ruin the whole joint.
You don’t need this hole to be too big, you just need it to be wide enough that your second joint can fit inside.
5. Poke A Hole In The Middle of Your Second Joint
This step is really important, so make sure you follow it exactly. Get your second and thinner joint and poke a hole right through the middle.
Again, this hole doesn’t need to be too big, and nowhere near the size, you poked through your first joint. Roughly double the size of your needle will do just fine!
This step is important because it will make the whole cross joint a lot easier to smoke. If you forget to poke a hole in your smaller, second joint, then the whole cross joint will be really hard to smoke.
It is very important to remember to include this step in your rolling process, so even if you’ve accidentally skipped this step, go back and add the hole if you can!
6. Put The Second Joint Into The First Joint
With the other steps done, now you are ready to assemble your cross joint! All you need to do for this step is insert one end of the second and smaller joint into the first and bigger joint.
It is very important that you do this slowly and carefully, using pulling, pushing, and rotating movements.
You will know when you’re done because the hole you poked into the smaller joint is inside the bigger joint. The closer the hole in the second joint is to the center of the bigger joint, the better the smoke will be!
7. Reinforce Your Cross Joint
All you need to do now is reinforce and seal up your cross joint. To do this, all you need to do is cut the glues off of two small rolling papers and wrap them around the area where the smaller joint goes through your fat joint.
This will make the whole cross joint more sturdy and it will also make the joint smoke better.
Conclusion
If you use this guide, you will find rolling cross joints to be really easy! Try this method out for yourself today!
Hi, I’m Zack Finch and I work as a Budtender for a Health & Wellness center here, in sunny California. I have been using marijuana recreationally for around 6 years now, and have many a time enjoyed the benefit that weed has to offer.
Whether you’re looking for informational guides about edibles, vape oil, CBD, how to roll a cross joint, the best blunt wraps, anything you can think of, I’ll cover it here.
What are you waiting for? Become a bud buddy and dive in now!


")

")

")

")